Recently I was asked to assist a colleague with her email management and took her through my system and helped her with her own set-up. I subsequently decided to document my personal system as it may be of help to others.
On the Shoulders of Giants
The primary philosophy behind my email processing system is based upon David Allen’s Getting Things Done (GTD). The GTD method rests on the idea of moving tasks out of the mind by recording them in a trusted system. This allows attention to be focused on acting on tasks, instead of remembering them.
Your mind is for having ideas, not holding them.
David Allen
The current GTD workflow consists of five stages: capture, clarify, organize, reflect, and engage. The first edition from 2001, and my copy of the book, lists the stages as collect, process, organise, review, and do. It is that edition that I attempt to follow and will refer to. The general principals are the same between editions.
The other ideal that I have strived towards is Inbox Zero. The term was coined by Merlin Mann and much has been written about keeping your inbox empty. Mann has stated that, the zero is not a reference to the number of messages in an inbox; it is “the amount of time an employee’s brain is in his inbox.”
In my view, Inbox Zero is the process of applying GTD to an inbox.
My System
Whist I refer to GTD above, I would like to stress that this is simply my own process and is not attempting to be a strict following of Allen’s workflows.
My system is predominantly based on Outlook Desktop for Windows and at the time of writing I am using Microsoft Outlook for Microsoft 365 v2005 Office Insider edition.
Also, it’s worth noting that my workflow changes from time to time and gets tweaked as software gets updated and changed or I simply have better ideas. I will update this document from time to time accordingly.
My primary requirements are:
- It must be simple
- It must be trusted
From a simplicity point of view, as you will find below, I have tried to automate as much as possible and make this system as quick as possible to work with.
With regards to trust, it might sound peculiar but to get things out of your head so you can focus, you need to trust your system. If you do not trust the system to remind you in a timely manner you will forever try to remember the things you need to do.
System Index
You can use this index to find your way around the document a bit quicker. Especially if wishing to return to review a section.
Collect
The email inbox is the ‘bucket’ into which 90% of people’s data arrives. Bank statements, requests from colleagues, meeting notes, project updates. It can be our biggest distractor and our biggest stress.
We will revisit collecting later in Collect Part 2 but for now less look at processing.
Process
The idea is to process as quickly as possible. Getting email out of the inbox and into your trusted system. Emails arriving can be processed based up the decisions of
- do it now,
- delegate it,
- defer it,
- delete it,
- or file it.
With regards to filing, I have experimented over the years with having folders for different projects or areas of responsibility, but I have moved away from that practice as it takes too much time to maintain. I have more recently started to use categories for certain items but on the most part the decision is delete or archive.
Triage – Delete it or File it
The first stage of processing is to ‘triage’ and remove what is not needed. Multi-select the emails that you know you do not need and don’t need to read and get them out of sight as quickly as possible. Delete them or file them for future reference.

Shift-Click allows you to select a group of emails by selecting the first one and the last one and Ctrl-Click allows for non-sequential selecting and they can then be deleted or filed.
Shortcuts
Delete it — Delete or Ctrl-D
Archive it — Backspace
The Ignore feature is quite useful if you really want to delete something and never see it again. It will delete the mail and automatically delete all future messages in the conversation.
Honestly, I rarely delete things – I find that the decision between filing or deleting adds time to the triage process. If in doubt archive!
Having archived or deleted everything that does not need opening what is left are emails that need to be read/scanned and potentially actioned. As you open each one, if you don’t delete or file then do it, delegate it, or defer it.
Do It
If it needs action and it can be done quickly then do it! The general principal that if you can ‘touch once’ then get it done immediately. If it’s going to take you away from processing for more than a few minutes, then defer it.
Defer
This is where the magic happens! The idea is to get it out of the inbox and into a system that will prompt you to action later. This is where most people’s battle is – their inbox becomes their to-do list.
Using the Outlook flag system one can note when action is needed on each email and this is the first process of placing an email into your ‘trusted system’.
Reference: How to Flag Email Messages for Follow Up
https://support.office.com/en-us/article/flag-email-messages-for-follow-up-9d0f175f-f3e9-406d-bbf7-9c57e1f781cc
The flag you set will depend on when you want to action the email.
| Flag | Start date | Due date | Reminder |
|---|---|---|---|
| Today | Current date | Current date | One hour before the end time of today’s work day |
| Tomorrow | Current date plus one day | Current date plus one day | Start time of current day plus one work day |
| This Week | Current date plus two days, but no later than the last work day of this week | Last work day of this week | Start time of current day plus two work days |
| Next Week | First work day of next week | Last work day of next week | Start time of the first work day of next week |
| No Date | No date | No date | Current date |
| Custom | Current date | Current date | Current date |
As you can see some flags are based upon the work week and that might vary from person to person. This can be controlled under outlook settings.

Flagging an email sets a reminder and prompts you to action it later. You can then file it away in the safe knowledge you will get a reminder, or you can access is in your To-Do List. We will look at the To-Do List later – for now we are just processing emails and getting them out of the inbox and into our trusted system.
Flagging alone does not clear the inbox, so once flagged we need to file it or archive it. As noted above I archive everything and don’t create separate folders.
To speed the process of filing use Quick Steps.
Quick Steps allows one to process quickly by flagging and filing in a single click. You can also assign priority though the Quick Steps and this will help you sort through your To-Do List later.
Reference: How to set up Quick Steps
https://support.microsoft.com/en-gb/office/automate-common-or-repetitive-tasks-with-quick-steps-b184f89f-3738-4562-96de-c0244ea830f2
The basic Quick Steps that I use are.
- Today
- Today (High)
- Tomorrow
- Tomorrow (High)
- This Week
- This Week (High)
- Next Week
- No Date
- Someday/Maybe


They all follow the same format as the samples above except for Someday Maybe.

Someday Maybe is the place to put things that one day might be interesting. An email about something that you would like to be reminded about from time to time but extremely low importance. We will look at categories later.
Delegate
If you are delegating a task it’s important to make sure it’s in your trusted system so that you can follow up in a timely manner if required. Most importantly it needs to get out of your head and into your trusted system. There are several ways of achieving this.
One can create a task from an email by dragging and dropping the email.

And then assign the task to an individual.


This moves a task into the trusted system so that it can be followed up.
I’m not a great fan of putting items directly into other people’s To-Do List unless this has been a communicated preference. My preferred method is to keep the email thread active.
In my system we use three types of Quick Steps.
- Forward Quick Step
- Agenda Quick Step
- Auto Agenda Quick Step
A Forward Quick Step that is used to forward anything to anyone.

No advanced options on the forwarding rule. This is nearly the same as using forward in the Toolbar with two differences. It clears flags from the original which may exist if the email was processed into your trusted system and have now decided to Delegate. It also moves the original email to the Archive.
The Forward Quick Step doesn’t set a flag, but if this email needs to be followed up then you will set the appropriate flag before sending and this will place the email into your ‘trusted system’.

An Agenda Quick Step is used if you often forward email to the same person and it’s beneficial to categorise the emails so that they can be easily searched. I use ‘A:’ in the name to indicate agenda.


An Auto Agenda Quick Step is used for very repetitive tasks. For example, if you routinely send emails to an individual that can be forwarded with standard email.

Processing Options
At this stage we have an empty inbox. Well done!
There are multiple variations of Quick Step depending on the type of task and turnaround time. The Auto Agenda Quick Step, for example, doesn’t always require a follow up. Customise for you own needs.
Do
Having achieved Inbox Zero we now need to do some work and get things done.
If you navigate to My Tasks in Outlook you will find the To-Do List and Tasks. To-List is where you will find your flagged emails and all other tasks, this is the part of Outlook where we should be spending the most time.
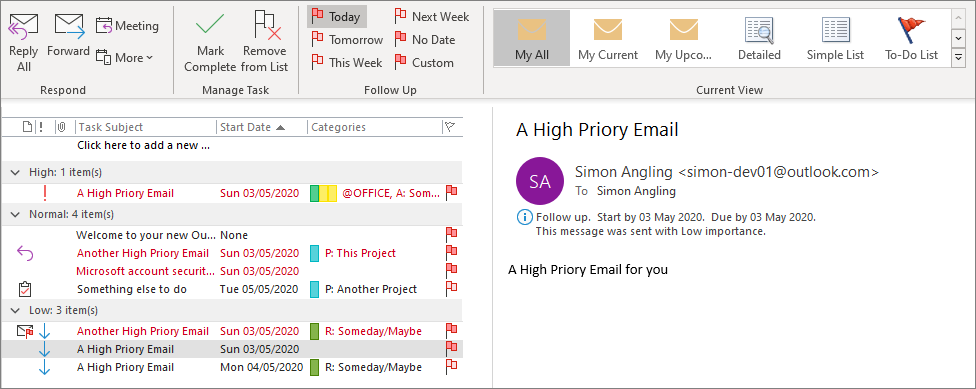
A standard To-Do list will look like this:

- The To-Do List.
- The To-Do List View.
- The task or email you wish to tackle.
- The Reading Pane is on in this view.
- We can see the category.
- If observant, we can see it is a high priority.
Custom To-Do Lists
It’s good start but I want to create three new views that will help me with my processing.
- My All
- My Current
- My Upcoming
To create a new view, select more on the Current View section of the Toolbar.

Then select Manage Views…

Once in Manage All Views you can select the To-Do List and click copy to duplicate it and then rename the copied view to My All.

This will bring up the Advance View Setting for My All and allow you to customise as follows.

Under ‘Columns…’ you will you want to make the following changes.

The columns needed are:
- Icon
- Priority
- Task Subject
- Start Date Categories
- Flag Status
- Check the columns listed compared to the list above.
- Remove any unwanted columns
- Find the columns you need to add
- Add the new columns
- Reorder the as per the pic above
Under ‘Group By…’ deselect ‘Automatically group …’ and group by Priority in Descending order.

Under ‘Sort…’ sort items by Start Date in ascending order.

This gives you a To-Do List that looks like this and has all tasks sorted by priority and then date in ascending order.

The next view to create is ‘My Current’. That is based up ‘My All’ with very minor changes.
- Duplicate ‘My All’,
- Change sort to Descending,
- Make changes to Filter.
To make changes to the filter you can select Advanced and Define the additional criteria:
- Start Date = on or before tomorrow
- Categories = doesn’t contain ‘someday’

This will hide items that have no date but will display tomorrow’s items as well as hiding anything categorised as ‘someday’.
If you want to do this quickly and without worrying if you have the right fields, you can paste the following code directly into the SQL tab.
("http://schemas.microsoft.com/mapi/id/{00062003-0000-0000-C000-000000000046}/810f0040" IS NULL AND "http://schemas.microsoft.com/mapi/proptag/0x10910040" IS NULL AND "http://schemas.microsoft.com/mapi/id/{00062003-0000-0000-C000-000000000046}/81040040" <= 'Tomorrow' AND "urn:schemas-microsoft-com:office:office#Keywords" <> 'someday')To last view is My Upcoming. This view shows what’s coming up in the next 7 days.
The only change here is to the Filter:
- Start Date = in next 7 days

Again, if you want to do this quickly and without worrying if you have the right fields, you can paste the following code directly into the SQL tab.
("http://schemas.microsoft.com/mapi/id/{00062003-0000-0000-C000-000000000046}/810f0040" IS NULL AND "http://schemas.microsoft.com/mapi/proptag/0x10910040" IS NULL AND %next7days("http://schemas.microsoft.com/mapi/id/{00062003-0000-0000-C000-000000000046}/81040040")% AND "urn:schemas-microsoft-com:office:office#Keywords" <> 'someday')After restating Outlook your customer view will display first and most of the time you will spend on My Current.
My All and My Upcoming should be checked routinely.
The reason I use Start Date rather than due date is that we need to start things in appropriate time to achieve the Due Date. Tracking by Due Date causes last minute rushes.
To-Do Bar
The To-Do Bar in the mail can be useful if you still find yourself in Mail a lot. Or even just a visual queue of what’s coming up and what’s overdue when processing.

- Click on View
- Turn the To-Do Bar on
- See the To-Do Bar
Note
I really encourage you to spend less time in Mail and more time in Tasks but there will be days that don’t go as planned. If you find yourself in email too much and skipping the processing stage don’t give up, once the system in set up one can always go back and process the emails that have accumulated and get back into the flow.
Again, we want to customise. To get to the To-Do List setting one must right click at the top of the To-Do Bar and Select View Settings…

Firstly, configure the ‘Columns…’, ‘Group By..’. and the ‘Sort…’ settings.

Next, the filer settings are:
- Date Completed = does not exist
- Flag Completed Date = does not exist
- Start Date = today
- Start Date = in the last 7 days
- Categories = doesn’t contain ‘someday’

The reason I include start date dating back 7 days is because sometimes we are supposed to start something on Monday that is due on Friday and we only get to it on Wednesday. We’re human! However, anything that has slipped more than that I don’t need to be reminded of and it will get picked up in a weekly review and rescheduled.
("http://schemas.microsoft.com/mapi/id/{00062003-0000-0000-C000-000000000046}/810f0040" IS NULL AND "http://schemas.microsoft.com/mapi/proptag/0x10910040" IS NULL AND (%today("http://schemas.microsoft.com/mapi/id/{00062003-0000-0000-C000-000000000046}/81040040")% OR %last7days("http://schemas.microsoft.com/mapi/id/{00062003-0000-0000-C000-000000000046}/81040040")%) AND "urn:schemas-microsoft-com:office:office#Keywords" <> 'someday')In an ideal world one should take everything that is overdue and reschedule and of course this can be done by simply right clicking on a flag but there is a trap in continually rescheduling for tomorrow over and over. I tend to leave it and then reschedule during a weekly review,
Organise
Priorities
We used priorities in our Quick Steps and in our To-Do Lists and To-Do Bar we can change priorities by clicking in that column. It’s a bit fiddly for normal as there is nothing to click on but click just left of the text and select Low, Normal or High.
Alternatively, you can drag and drop to change the priority of a task.


Categories
We’ve mentions categories so let’s look at them in bit more detail. The four category types that are used are:
- @ denotes a location
- A: denotes a person (agenda)
- P: denotes a project
- R: denotes reference material (for example R: Tax Stuff, R: Family, R: Medical)

Searching
As well as normal text search you can use categories and priorities to narrow the search.

Search Folders
Following on from search, one can create Search Folders.
Search folder are useful for easily finding the emails that are relating to specific categories.


However, creating a Customer Search Folders give you more flexibility. For example, emails that are flagged for a certain category.

Once a Search Folder is created if you use it frequently then you can right click and ‘Add to Favourites’.
Collect Part 2
Tasks
Another form of collecting is to use Tasks and create a Task. A To-Do item doesn’t always have to start with an email. Tasks are also useful if you have recurring items like month reports that need to be scheduled.

Email Reminders
I’m sure most of us have sent a quick email to ourselves now and again to remind us of something (can’t just be me) that need to be done.
The key here is to differentiate the email quickly and easily so that you can create a rule to apply categories and flag to.
The key is to specific subject lines and keep them simple so that when you are on the run you can remember and type them quickly. As long as the reminder gets into the trusted system you can always recategorize later.
- MyBoss
- ToRead
- Reminder
- NextWeek
Another option that can be used is a Gmail account as that allows us to tag the emails very easily so these reminders can be filed into the trusted system.
With Gmail you can add a plus into the email:
- simon+myboss @ gmail.com
- simon+toread @ gmail.com
- simon+reminder @ gmail.com
NOTE
Plus Addressing has been made available in M365 since this post was written and works the same way. You can find more details in this post Plus Addressing in Microsoft 365
If you can use Gmail you can set up an account (if you don’t already have one) and set it up to forward all emails to your main account in Outlook (assuming you are not using Outlook to Access your Gmail already).


- Click Settings
- Select Filters and blocked addresses
- Select Forwarding and POP/IMAP
- Click Add a forwarding address
- Enter your main email address
- Click Next
- Click Proceed
- Click OK
Once that’s done you will get an email in your primary mailbox asking you to click a link to confirm. If you can’t find it check your Junk Mail.


Click through the confirmation screens.

Once confirmed go back to Setting and set up for all incoming email to forward and click Save Settings
- +toread
- +idea
- +watch

So, for this example we will use +someone and we will see that this now forwards into our main address.
But we can also use the subject line to create the rule. It’s just a choice at step 5.
Note
Of course, you can also create rules for email from a certain person. You may want all emails from your boss to get flagged as urgent straight away.


Once the test email arrives:
- Right click the email
- Select Rules
- Create Rule
- Click Advanced Options
- Select sent to address or subject line (depending on your reminder method)
- Select Specified Folder (Archive) and Category
- Flag the Message – if unsure then select Today as you can always change it when next in your To-Do List
- Click Next Twice and then Finish
You can set up as many of these as you like but they are mostly used for email from a cellular device when on the move.
Note
Another thing about email addresses in Gmail. As well as adding a + code you can also move the periods or remove or add. So simon.dev@ is the same as simondev@ is the same as s.im.on.dev@
Summary
Future Additions
There are several areas of the system that still need documenting.
- Office 365 Web Access
- Microsoft ToDo
- Android
- Outlook on Apple Macintosh.
- iPhone/iOS
- OneNotes
- Outlook Notes
Comments and Ideas
I hope you found this useful and I welcome any comments, suggestions, or criticisms. I would love to hear if this has been helpful or any modifications you have made to your own system.
Please leave comments below.
Hello, thank you for documenting your workflow! Why go through the trouble of creating a second email account rather than creating a rule that performs the same actions if you receive an email from yourself?
The reason I like using gmail for certain tasks is the one can add +anything to the emmail. For example, myemail+todo@gmail.com and myemail+toprint@gmail.com or myemail+download@gmail.com – you get the idea.
Thank you! Another question if I may. Where do you park flagged emails that are waiting on someone else? Do you turn them into a task or just push out the reminder a few days?
I’m so sorry for the delay in replying. I send a reminder in a few days so I set the flag generally at the point where I want to follow up. I also create a Category called “A:Jeremy”, for example, A standing for Agenda.
Thank you. For the benefit of others reading through this, Creating a specific @Waiting-For category would fit my needs better so I can scheduled a “follow up on things I am waiting for” work session and focus on those items rather than a specific person. There is no guarantee that I have a scheduled, standing meeting with a particular person and may not be prompted to look at the agenda category for that person.
Hi
I try to work after the GTD way, but paper based for the time, mostly
I just have one question to your system
How do you handle “waiting for” – e-mails that you have send to a person and now waiting for his reply or feedback
I have in outlook the option, as I send the e-mail to a person, that it automatically at same time send it also to a folder named “waiting for” that I follow up on
But what about taskes – how do that wok in your system to be sure you get feedback or remove a task when you have get the feedbacks you aske for – many times I feel that I’m losing the overview due the system not automatically ref to the task or remove it from my to-do list
Thanks in advance
Thanks for the very interesting set up, I will really try to use it and see if this works.
Some comments:
1) Category Someday/Maybe is a reference or a location ?
In the Quick Steps, you used the category @SOMEDAY/MAYBE but later you mentionned the category R: Someday/Maybe
2) The “Complete” column doesn’t appear in the screenshot for the “My All” view
3) Typo:
“customer view” -> “custom view”
“filer settings” -> “filter settings”
Sorry for the delay in replying – in David Allens book he uses @Someday/Maybe but I started using the prefix R: for reference items. It’s personal preference and can be adjusted. But in GTD @ referred to a location. @Office, @Home, @Internet – which give a filter on what needs to be done at certain times. I don’t use this that much to be honest.
Some comments:
A) Category Someday/Maybe is a reference or a location ?
In the Quick Steps, you used the category @SOMEDAY/MAYBE but later you mentioned the category R: Someday/Maybe
B) The “Complete” column doesn’t appear in the screenshot for the “My All” view
C)
Typo:
“customer view” -> “custom view”
“filer settings” -> “filter settings”
Congratulations for the article, I really liked it and I’m trying to implement it. You create category for each project, like Q: Project 1, and when the project is complete, what to do with the category?
Thanks for the question Alex. When you delete a category it removes it from the master list but doesn’t remove the category from the already categorised email so as projects are finished then go ahead a remove tidy up the list. It’s worth nothing that I only do this for larger projects and increasingly I just use the search function. I’m busy with a video on the changes I’ve made over the last year – whatch this space!
Thanks for the post. This was exactly what I was looking for. As you stated ‘Simple’. Probably the most important criteria for me.